

There are a ton of hacks out there to save homeowners the cost of an in-ground, professionally installed irrigation system for a lawn. I’ve watched the top videos, read the resources on this topic. Here’s what I’ve come up with for the best set up for a budget friendly sprinkler system you can make yourself with a garden hose.
- Pro's & Cons of a DIY Garden Hose Sprinkler Setup
- First Things to Consider When Building a Sprinkler System with a Garden Hose:
- Garden Zone Planning
- What You Need to Build a Garden Hose Sprinkler System Yourself
- Notes on The Materials
- Step By Step: How To Build A Budget Friendly Garden Hose Sprinkler System
- Post Set-Up Tips
Pro’s & Cons of a DIY Garden Hose Sprinkler Setup
The one downside to this setup is that these are above ground sprinkler heads. So they will be exposed for everyone to see. And it will take some work to set up.
The upside? This DIY system can be set-up for a fraction of the cost of paying a professional landscaper to set up an in-ground sprinkler system. Some homeowners say they were able to do it for $500 after getting a professional quote for $7,000. That’s over 90% savings on an in-ground sprinkler system.
Also remember, homeowners who have their sprinkler system professionally installed rely on a professional to fix anything that goes wrong, which is also expensive. By self-installing, you’ll be able to tackle any issues that come up on your own.
First Things to Consider When Building a Sprinkler System with a Garden Hose:
1. What is the size of your yard?
You’ll want to measure the dimensions of your yard in feet to determine how many sprinkler heads and hoses you’ll need.
Pro Tip: Start out with one just sprinkler head and hose and see what kind of spraying action you’re able to achieve. Water pressure GPM levels vary from home to home, which could alter spraying distances and behaviors. It’s not a bad idea to test one out before moving forward with purchasing the equipment for your whole yard. You can always buy more sprinkler heads and garden hoses based on your findings with the one.
2. Taking Measurements
You want to determine the distance from your outdoor faucet to the location of your first sprinkler head to be installed. Try to imagine a garden hose connecting the sprinkler head. What contour makes you hose the least visible? For many yards this is along the frame of your home. For others it may be more of a direct line, covered with mulch.
Use some measuring tape to determine how long of a garden hose you’ll need and potentially how many sprinkler heads you’ll need. This will also give you a good idea of the total cost of the project.
I like the Orbitz sprinkler heads because they have adjustable spray settings that can be adapted to the shape of your yard. Some areas of your yard need a full 360° circle spray. Some need 180°. This one goes down to 25°.
There are also 6 spray settings to adjust the distance it sprays from the sprinkler head, topping out at an 80 foot spraying distance.
3. Come up With a Plan
Consider your water usage and where your spray will go. You don’t want to waste water, spraying it where it’s unneeded, or worse spraying a neighbor as they’re trying to get in their car.
Garden Zone Planning
One tricky aspect of any sprinkler system set up is that some plants need more water than others. Trees and shrubs, for instance, need more water than your lawn does. How do you tackle that?
What’s great about the 4 way timer listed below, is that each outlet has its own timer. So you can plan for one hose to go to a section of your yard that has plants that require more water and set the timer so that it waters those areas a bit longer or more frequently.
You can keep it simple, or you can go all out with a complex garden zone plan. The important thing is to consider plant groupings before they go in the ground.
It can be challenging, but try to put the sprinkler heads that will be watering thirstier plants along the same hose line, controlled by the same timer. That way you can target a heavier watering schedule to those plants only.
What You Need to Build a Garden Hose Sprinkler System Yourself
Now that you have an idea of where your sprinkler heads will be located and the length of hose you’ll need to get water to them, you’re ready to start buying materials. Here’s what you’ll need:
- Gear Drive Sprinkler Heads
- 4 Way Hose Splitter/Timer
- Steel Garden Hose
- Lead in Garden Hose
- Brass Hose Splitter
- Hose Repair Kit with Quick Connects
Specific products I’d recommend to build a DIY garden hose sprinkler system. Amazon links included:


Notes on The Materials
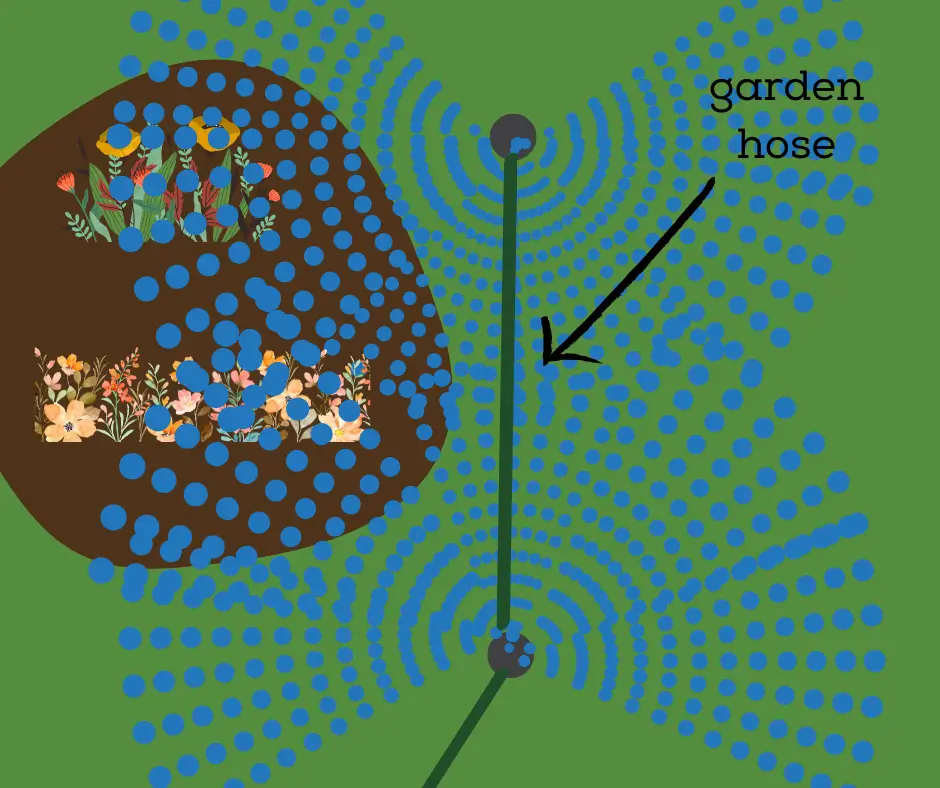
- If you’re into a techie upgrade on the water timer, take a look at the Orbit Bluetooth Smart Timer. Also consult your plans. Depending on your yard’s shape and watering needs, you may find all you need is a two way splitter or even a single outlet timer. You may find your best plan is to run a hose in a straight line connecting one sprinkler head to the next as in the diagram below:
- Why the Bionic Steel Hose? Its a bit more durable that a regular vinyl or rubber hoses, which are meant to be housed on a garden hose reel. Not only does the steel hose resist UV damage caused by the sun, it will thwart rodents from chewing through it.
- You likely will need more that one hose – This will depend on the size & configuration of your yard. Take a look at your yard measurements. Try to approximate what combination of leader hose & steel hose you’ll need. You might even find that buying one large hose and cutting it to smaller sizes might be better. More on that below. You also may read up on the hoses that work well under constant water pressure.
- The Hose Splitter will attach directly to your outdoor faucet. One side will go to your garden hose sprinkler system, leaving the other side that free as a normal hose bib.
- You also may need more hose repair kits. Or you may not need any at all if you can find hoses that match the distances from your water source to sprinkler heads. You may need to cut hoses and crimp new fittings on the the end of your hose. You’ll probably will need at least one. Plus they’re handy to have around even if you find you don’t need them right away.
- Quick connects – these are also handy things to have around and you’ll probably need a bunch of them if you have multiple sprinkler heads. They make it super easy to connect & re-connect your hoses if necessary. Try these quick connects if you’re looking for some not in a kit and need a handful.
Step By Step: How To Build A Budget Friendly Garden Hose Sprinkler System
Now finally on to the nuts and bolts of the project. Let’s get your garden hose sprinkler set up. Watch this video before you get started:
Step 1:
Attach Brass Hose Splitter to Hose Bib – This should be pretty straightforward. The most important thing is make sure you’re not getting any leaks. Remember with this system, you’re going to have your hose bib in the “on” position at all times. You don’t want a leak, not even a small one. Applying teflon tape to all threadings in this process is good practice to prevent leaks.
Step 2:
Connect 4 Way Splitter/Timer to Brass Splitter with Leader Hose – You could attach the timer directly to the brass splitter. However, it will clutter that area, making it harder to use the other side of the brass splitter. Best to attach the leader hose to the brass splitter, then the timer to the leader hose.
Step 3:
Put Your Obit Sprinkler Head in The Ground – Consult your plans and put your a sprinkler in the first position closest to your water source. The spike at the bottom should make it easy.
Step 4:
Connect Timer to Sprinkler Head with Garden Hoses – Run your metal hose from your timer to your sprinkler head. Use garden stakes to hold the hose in place if needed. In the planning phase you should have determined how long this distance it. If your metal hose covers that distance, great. If not you’ll need to make up that distance with a normal garden hose and cut it to size, then repair it. Here’s another article to help you shorten a garden hose if needed.
Step 5:
Turn on your water source – Set timer to allow water to flow to the sprinkler. Consult the instructions for the sprinkler head to adjust spray distance and angle. You’ll need to tinker with it a bit so that you cover as much area as possible without wasting water. Look for leaks at the fittings and apply teflon tape if necessary.
Step 6:
Evaluate and Repeat – Now it’s just a matter of examination and adding more sprinkler heads in your yard according to your plans & measurements.
Post Set-Up Tips
Now that you have your DIY, budget friendly garden hose sprinkler system set up, you want to set your timers so they are going off at the correct intervals
When to Water Your Garden
The plants in your yard will do best when watered once a day early in the morning. Set your timer to come on at 5am once a day. Watering in the middle of the day would both over-evaporate water and heat the water up, which can damage plant roots.
You need to give the water that is on the leaves of your plants a chance to dry off during the day. Watering too late in the evening prevents water from evaporating from leaves. This can result in fungal growth that can damage, even kill plants.
Trees & shrubs tend to require a bit more water than a lawn. Some trees require a lot more water. Do some research about the watering needs of the plants in your yard and set the timers for them accordingly.
Maintenance
You’ll want to check from time to time for leaks. Apply teflon tape to leaks at the fitting locations. Replace garden hoses if needed. A big leak that goes unnoticed can cause your water bill to spike.
Pro Tip: Covering your garden hoses with mulch does a couple things: 1) it makes your yard look nicer 2) It protects your hose from UV rays, extending the life of the hose significantly.
Dry Spots and Over-Watering
DIY or professionally installed, it’s rare that a sprinkler system is perfect. You’ll probably find, for instance, that it’s hard to get the right amount of water to every part of your yard. You set up one garden zone to water twice per day. As a result, some of your lawn thats near thirstier plants gets over-watered.
Conversely, there may be an awkward corner of your yard that just does not get enough water.
If you’re the obsessive type, you’ll probably keep trying to add new hoses & sprinkler heads until every inch of your yard is watered perfectly. You’re welcome to try. If you’re not up to it, it’s ok to simply hand water dry spots as needed. Remember, you’re a steward of the land and your plants sometimes like for you to give them some personal attention. 🌞